

- All
- Product Management
- News and Information
- Introduction content
- Enterprise outlets
- Frequently Asked Questions
- Corporate Video
- Company Portfolio

DF-6 High-Precision Asphalt Elongation Tester
Category:
- Product Description
- Product Packaging List
- Product Use, Care, and Maintenance
- Instrument Operating Procedures
- Comparison Table for the Same Series
- Product video
-
Feature Introduction
This instrument is multi-functional and serves as a versatile asphalt testing device that integrates both the ductility test and the elastic recovery test for asphalt. The instrument is designed and manufactured in accordance with the following standards:
1. GB/T 4508-2010 “Method for Determination of Asphalt Ductility” and T 0605-2011 “Asphalt Ductility Test” as specified in JTG E20-2011 “Test Procedures for Asphalt and Asphalt Mixtures in Highway Engineering”;
2. NB/SH/T 0737-2014 “Method for Determination of Elastic Recovery of Asphalt (Ductility Tester Method)” and T 0662-2000 “Asphalt Elastic Recovery Test” as specified in JTG E20-2011 “Test Procedures for Asphalt and Asphalt Mixtures in Highway Engineering.”
I. Main Technical Features
1. It features an industrial-grade touch screen, advanced technology, high-end products, and excellent performance.
2. Controlled by a 32-bit ARM microcontroller, featuring dual upper-and-lower tank constant-temperature control technology, automatic water bath temperature control, and automatic acquisition and processing of tensile and temperature data.
3. A novel tension-drive design featuring a combination of imported lead screws and guide rails ensures smooth, synchronized stretching without any vibration or jerking. The speed is uniform, and the elongation and temperature readings are highly accurate.
4. It employs a high-power compression refrigeration system with a shielded, dual-tank, hot-and-cold balanced pressurized circulation system. This ensures rapid cooling and more uniform bath temperatures.
5. The average elongation at break and test temperature are automatically calculated and displayed. Print the test results.
II. Main Technical Indicators and Parameters
1. Power supply: AC (220 ±10%) V / 50 Hz.
2. Measurement range: 1.5 m (±10 mm).
3. Temperature control method: Refrigeration by compressor, with electric heater for heating compensation.
4. Bath fluid circulation: A shielded, hot-and-cold balanced pressurized circulation system. Constant-temperature operation with dual upper and lower water tanks.
5. Temperature control range: Adjustable from 5℃ to 50℃, with digital display and a temperature display resolution of 0.01℃.
6. Temperature control accuracy: ±0.1℃.
7. Stretching speed: Two levels—10 mm/min and 50 mm/min; other speeds can also be set.
8. Reset Speed: Extension carriage return—two speed settings: fast at 500 mm/min and slow at 50 mm/min.
9. Measurement accuracy: ±0.1 mm.
10. Elongation display: Real-time display on the industrial control touchscreen.
11. Elongation Recording: ⑴ Recorded via the elongation shortcut key; ⑵ Recorded via the industrial control touch screen.
12. Data Output: Real-time display on the industrial control touch screen; print output via printer.
13. Cooling mode: 1.25 HP compressor cooling, with an input power of 950 W.
14. Ambient temperature: -10℃ to +35℃.
15. Relative humidity: ≤85%.
16. Overall dimensions: 2365 mm × 530 mm × 950 mm (length × width × height).
17. Total power consumption of the entire machine: Not greater than 5000W.
-
I. List of Accessories for the DF-6 High-Precision Asphalt Elongation Tester (Standard Configuration at Factory)
Serial number
Name to call
Unit
Quantity
Note
1
D F-6 High-precision Asphalt Elongation Tester Host
Taiwan
1
2
Asphalt ductility test mold frame
Pay
3
3
Asphalt ductility test mold
Pay
3
4
Asphalt Elastic Recovery (Tensile Strength at Break) Molding Frame
Pay
3
Optional
5
Asphalt Elastic Recovery (Tensile Strength Elongation) Test Mold
Pay
3
7
Socket ( 250V32A Three-core)
Only
1
With bottom box
8
Fuse RL1-60/40A
Only
4
9
Mold trial plate
Only
1
10
Instruction Manual
portion
1
11
Certificate of Qualification
portion
1
12
Product Warranty Card
portion
1
Supporting software (download from website)
II. Reagents and Equipment Required for Installing the DF-6 High-Precision Asphalt Extension Tester
Serial number
Name
Specifications and Requirements
Quantity
Note
1
Glycerol
500ml
1 bottle
2
Asphalt solvent
2L
2L/bucket
Kerosene
3
Talc powder
500 grams
4
Scraper
1 piece
5
Brush
2 cm wide
2 units
6
Electric furnace
1000W
1 unit
Instructions:
1. The reagents and equipment required for instrument installation shall be provided by the user.
2. For the use, handling, and storage of toxic and hazardous reagents, please follow the relevant regulations.
3. Before using this instrument, carefully read the instruction manual and the relevant industry standards.
-
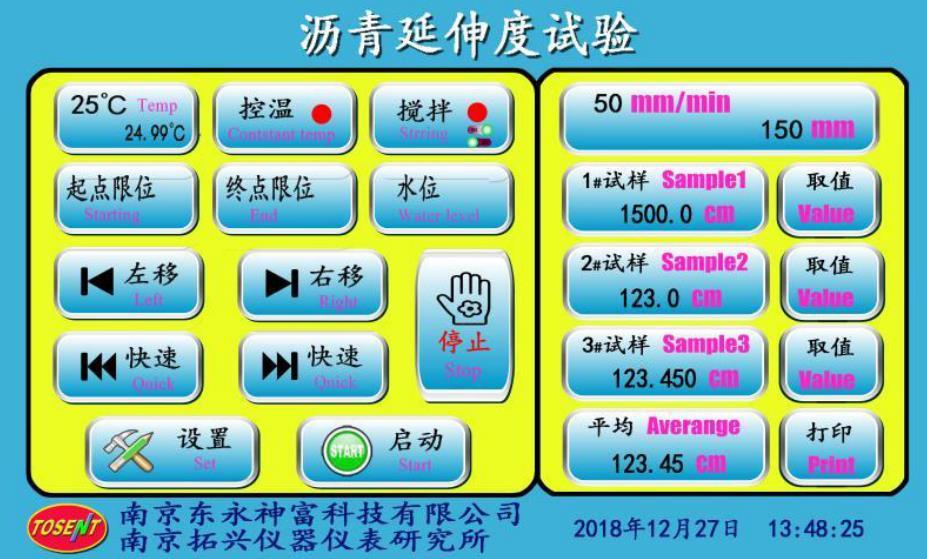
Product Use, Care, and Maintenance
Inject an appropriate amount of water into the instrument, ensuring the water level reaches 25 mm above the top of the test mold. Air will automatically escape from both ends of the water tank. Once all the air has been expelled, plug in the power cord, turn on the power switch, and press the “Stir” button to remove any remaining air.
Operating instructions:
Test selection:
Click “Asphalt Elongation Test” at the top of the LCD screen to select either “Asphalt Elongation Test” or “Asphalt Elastic Recovery Test.”
Extended Speed Selection:
Click the display window in the upper-right corner to bring up the keyboard, enter the extension speed, and then press Enter.
Temperature setting:
Click the temperature display window in the upper-left corner to bring up the keyboard. Enter the desired temperature setting and press Enter to confirm.
Temperature control:
Click “Temperature Control,” and the indicator light will illuminate, activating temperature control. Click again, and the “Temperature Control” light will turn off, deactivating temperature control.
Click “Stir,” and the indicator light will turn on, starting the water circulation. Click again, and the light will turn off, stopping the water circulation.
Small car action:
The “Start Limit” indicator light is on, indicating that the trolley has reached the start position.
The “End-of-Travel Limit” indicator light is on, indicating that the trolley has reached the end position.
The “water level” indicator light is on, and the water level has reached the standard height.
Click the “Left Shift” key to extend the cart and move it 50 mm/min to the left. The indicator light will turn on, and the cart will stop once it reaches the starting position. The indicator light will turn off. Click the “Left Shift” key again to stop the cart from moving.
Click “Right Shift” to extend the cart and move it 50 mm/min to the right. The indicator light will turn on, and the cart will stop at the destination position. The indicator light will then turn off. Click this button again to stop the cart from moving.
Click “Quick Left Shift” to extend the cart’s movement 500 mm/min to the left; the function is the same as above.
Click “Quick Right Shift” to extend the cart 500 mm/min to the right; the function is the same as above.
Click “Stop,” and the car will come to a halt no matter the circumstances.
Click “Settings” to configure instrument temperature calibration, electronic clock settings, and more.
Click “Start,” and the instrument will begin the test according to the set parameters.
Click “Get Value” to record the extended data results; record 3 results, and the extension will automatically stop.
Test Temperature Display Window: The temperature display window located in the upper-left corner of the screen; the top row shows the set temperature, while the bottom row displays the measured temperature.
The test speed and extension length are displayed in the upper-right corner of the screen: The top row shows the set extension speed, while the bottom row displays the actual extension length.
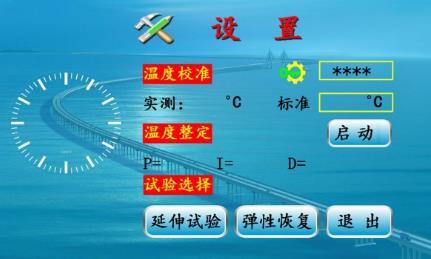
Temperature calibration
On the test interface, click the “Settings” button to enter the settings interface.
Place the temperature sensor next to the standard temperature sensor. After waiting for 10 minutes, click the “Standard Temperature” window. A keyboard will appear; enter the standard temperature and press the “Confirm” key.
Temperature setpoint
If the water temperature control fails to achieve the desired precision, click the “Start” button located behind the temperature setpoint adjustment. The indicator light for the “Start” button will illuminate. Once the adjustment is complete, the “Start” button indicator light will turn off, signaling that the adjustment is finished and the instrument will automatically enter a constant-temperature state.
-
Operating Procedure for the DF-6 High-Precision Asphalt Elongation Tester
1. Ensure there is 30 cm of space behind the instrument to guarantee proper heat dissipation.
2. Ensure that the water level in the instrument’s water tank meets the required height [25 mm above the mold test area];
3. Insert the power plug securely and ensure good contact.
4. Power on, set the test temperature, and maintain the temperature control.
5. Set the extension rate and select the test item.
6. After the water temperature has returned to normal for 30 minutes, install the properly cured specimen onto the instrument. If the specimen is difficult to install, you can adjust the position of the carriage by pressing the “Left” or “Right” button on the device.

7. Click the “Start” button to begin the experiment. To ensure stable and accurate experimental temperature, there is no need to turn off the temperature control. The water flow circulates beneath the baffle, leaving the experiments above unaffected, and the instrument remains vibration-free.
8. Observe the specimen, and when it breaks, tap the corresponding specimen value icon on the touchscreen or press the corresponding shortcut key on the instrument.
9. When three specimens break, the instrument automatically stops extending.
10. Click the “Quick Left Shift” button, and the instrument will automatically reset at a speed of 500 mm/min, stopping automatically once it reaches the starting position.
After using the instrument for a while, the water has become slightly cloudy. Please change the water and clean the tank to keep the instrument clean.
Next:
Product Inquiry
If you’re interested in our products, please leave your email address, and we’ll get in touch with you as soon as possible. Thank you!


