

All
- All
- Product Management
- News and Information
- Introduction content
- Enterprise outlets
- Frequently Asked Questions
- Corporate Video
- Company Portfolio
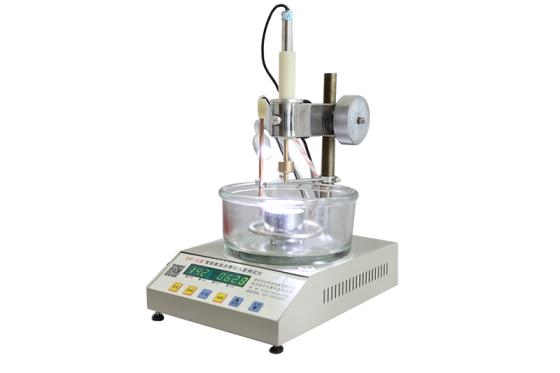
How should an asphalt penetration tester be used?
2020-05-22
Use of the Asphalt Penetration Tester:
1. Heat and melt the pre-dewatered sample, ensuring that the temperature does not exceed 90℃ above the sample’s estimated softening point. Stir thoroughly for no more than 3 minutes, then sieve the mixture before pouring it into the sample dish.
Its depth should be at least about 10 mm greater than the expected penetration value. Place it in an air temperature of 15–30℃ and allow it to cool for 1 hour. During cooling, ensure that no dust falls into the sample.
2. Immerse the sample dish completely in a water tank filled with clean water, and maintain the temperature for 1 to 1.5 hours. During this process, turn off the needle spotlight to extend its service life.
3. After adding the specified amount of clean water to the tank, connect the special heater to the digital display temperature controller. Place the temperature probe into the tank. When the water temperature exceeds 25℃, adjust it down below 25℃. Then, following the instructions for the digital display temperature controller, set the desired control temperature.
4. Adjust the asphalt penetration tester to ensure it is level with water. Adjust the needle rod and counterweight, and loosen the locking screw on the cantilever to allow the cantilever to drop until the needle tip is approximately in contact with the specimen. Then, tighten the cantilever nut to lock the cantilever in place. Next, finely adjust the lifting platform so that the surface of the specimen is just in contact with the needle tip. At the same time, set the digital display to zero and ensure that the bottom contacts of the dual digital displays at the top of the needle rod are properly engaged.
5. Turn on the power switch, and the digital display will show zero. Press the start button; the circuit will begin timing, and at the same time, the needle rod will be released, allowing the standard needle to freely penetrate the specimen. When the preset time of 5 seconds is reached, the computer’s timer will stop displaying. At this point, securely fasten the needle rod to prevent it from continuing to descend. Then, manually pull down the bottom contact of the digital display so that it makes contact with the top surface of the needle rod. The value displayed at this moment is the penetration depth of the specimen.
6. The same sample shall be tested repeatedly at least three times. Each penetration point and its distance from the edge of the sample dish must be no less than 10 mm. The average of the results from these repeated tests shall be taken as the result for this sample.
7. Before each test, the water temperature in the保温皿 should be checked and adjusted. After the test, the standard needle should be removed and wiped clean with cotton or a dry cloth that has not been exposed to any solvents (such as benzene or gasoline), then dried thoroughly with cotton or cloth.
8. The digital display unit of the instrument should be carefully protected from moisture. If, after prolonged use, you notice that the digital display has become unclear, simply replace the battery with one of the same specification by unscrewing the cover. Do not open any other components at will to avoid damage.
Relevant Information

The main advantages of the penetration tester are:
The main advantages of the penetration tester are:
2023-11-02

The working principle of the compaction apparatus mainly includes the following points:
The working principle of the compaction apparatus mainly includes the following points:
2023-10-23

The compaction instrument is a device used to measure the bearing capacity of bored pile foundations. Its main features are as follows:
2023-10-13