

All
- All
- Product Management
- News and Information
- Introduction content
- Enterprise outlets
- Frequently Asked Questions
- Corporate Video
- Company Portfolio
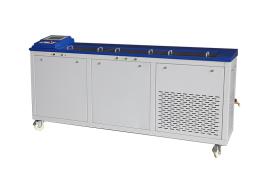
Common Faults and Solutions for Asphalt Extensometers
2020-03-19
The common faults and troubleshooting methods for the asphalt ductility tester are as follows:
① Fault: The leakage protection device trips when the power is turned on.
Reason: The residual-current device (RCD) detection system monitors the ground current. Since this instrument requires grounding to operate, some instruments may cause the RCD to trip.
Solution: Bypass the power supply through the residual-current device (RCD) or replace the RCD with one that allows a higher leakage current.
② Fault: Slight electrical leakage from the instrument’s casing.
Reason: The instrument's grounding is unreliable.
Solution: Inductive loads may induce static electricity on the instrument’s casing. To ensure reliable grounding, connect the instrument’s rear grounding terminal to earth using a wire with a cross-sectional area of at least 2 square millimeters. A more reliable grounding method is to wrap the grounding wire around a radiator or bury it directly in the ground. Another simple and feasible way to eliminate leakage current is to swap the positions of the neutral and live wires in the power cord.
③ Fault: Cannot automatically return to the home position.
Reason: The limit switch at the starting point is damaged.
Solution: Open the machine cover and replace the limit switch on the starting-side.
④ Fault: The compressor starts but fails to cool or the cooling speed is very slow, or the compressor fails to start.
Reasons: The condensing fan is positioned too close to the wall, resulting in poor ventilation; the compressor is lacking refrigerant; and accumulated refrigeration oil makes it difficult for the compressor to start.
Solution: The instrument needs to be repositioned to ensure proper ventilation, and a professional refrigeration engineer should be called in for repair.
⑤ Fault: The transmission shaft is making an unusual noise.
Solution: The guide rails and transmission shaft are poorly lubricated; please add lubricant.
⑥ Fault: The drain valve is leaking.
Solution: Remove the valve, wrap it with waterproof tape, and then tighten it again.
⑦ Fault: The motor does not rotate, the tensile test cannot be performed, and the manual function has also failed.
Solution: The inverter is damaged. Replace it with an inverter of the same model.
⑧ Fault: The printer cannot print.
Possible causes include: The printer is not online—press the printer’s “SEL” key to bring the printer online; or the printer is out of paper.
Solution: Please refer to the WD-A Micro Printer User Manual or follow these steps to load paper into the printer: Press the “Out” button to open the cartridge compartment; then, lift up the printer’s front panel. Gently apply a bit of outward pressure on both ends of the paper roll holder to easily remove the paper roll. Next, slide the new paper roll onto the paper roll holder. Press the “SEL” button to turn off the printer’s indicator light, then press the “LF” button to rotate the print head. At this point, manually feed the paper end into the front inlet of the print head; the paper will gradually feed into the print head until about 1 centimeter of paper protrudes from the gap between the print head and the upper housing. Then, press the “SEL” button again to stop the print head and re-establish connection. Close the printer’s front cover, pass the printing paper through the paper exit slot in the front cover, push the cartridge compartment back onto the printer’s panel, and make sure that both sides of the cartridge compartment are securely locked.
⑨ Fault: The printer is printing unclearly.
Solution: The ribbon has aged. Please refer to the instructions for replacing the ribbon. For details, consult the WD-A Micro Printer User Manual or follow these steps to replace the ribbon: Open the printer cover. First, place the right end of the ribbon cartridge onto the gear on the right side of the print head. Use your hand to hold down the knob on the ribbon cartridge, then gently turn it clockwise until the right end of the cartridge rests firmly against the base. Next, lower the left end of the cartridge. Check whether the ribbon is fully straightened. If it’s not straightened or if part of the ribbon is still visible outside the cartridge, continue turning the knob on the cartridge until the ribbon is completely retracted and straightened inside the cartridge.
Attachment: Method for Adjusting Temperature-Control Parameters
When the instrument exhibits issues such as inaccurate temperature control or temperature fluctuations, please follow the steps below to correct the temperature.
Check whether the circulating water pump is operating normally and whether the pump’s outlet pipe shows any signs of bending or curling. Inadequate water circulation can lead to temperature fluctuations.
Check whether the compressor is operating normally and whether, after the compressor stops and restarts, the motor stalls, preventing the compressor from starting up immediately.
Is the heating tube functioning properly? Observe whether the icon of the actuator displayed on the screen matches its actual output. For example, if the screen shows a snowflake symbol but the compressor is not running in reality, this indicates a malfunction in the refrigeration system.
After the inspection is complete and you’ve confirmed that all output actuators are functioning properly, you can achieve better temperature control by adjusting the temperature-control parameters.
Relevant Information

The main advantages of the penetration tester are:
The main advantages of the penetration tester are:
2023-11-02

The working principle of the compaction apparatus mainly includes the following points:
The working principle of the compaction apparatus mainly includes the following points:
2023-10-23

The compaction instrument is a device used to measure the bearing capacity of bored pile foundations. Its main features are as follows:
2023-10-13