

All
- All
- Product Management
- News and Information
- Introduction content
- Enterprise outlets
- Frequently Asked Questions
- Corporate Video
- Company Portfolio
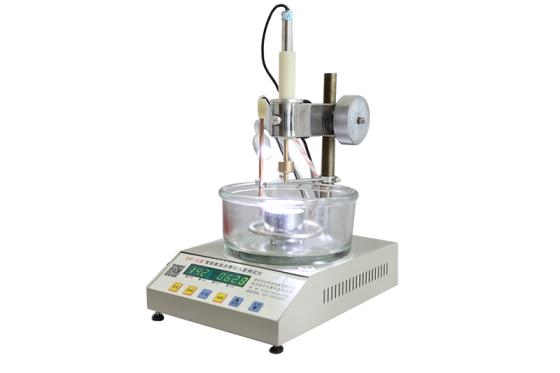
Installation and Operation of the Asphalt Penetration Tester
2020-07-08
The asphalt penetration tester is suitable for determining the penetration of residual materials left after evaporation of road petroleum asphalt and liquid petroleum asphalt.
Debugging and installation instructions:
1. After unpacking, check whether any damage has occurred during transportation.
2. Check against the packing list to ensure all items are included, and promptly notify the seller if any items are missing.
3. Plug in the power supply and turn it on. At this point, the display screen shows the time “5.0”.
4. To ensure detection accuracy, after powering on for 20 seconds, press the instrument’s button. At this point, the needle rod assembly should be able to fall freely.
5. To adjust the instrument to a horizontal level, follow these steps: Rotate the adjusting foot screws until the bubble in the spirit level is centered. At this point, the working surface will be perfectly horizontal.
Operating Procedure:
1. Power on: Turn on the power switch and adjust the constant-temperature bath temperature to 25℃ by heating or cooling with cold water.
2. Place the specimen into a constant-temperature water bath and keep it there for at least 1 to 1.5 hours.
3. Attach the test needle, loosen the set screw at the back of the lifting frame, and move the lifting frame up and down to the appropriate position before tightening the screw. Then, use the fine-tuning handwheels on both sides to slowly lower the needle linkage until the needle tip just touches the surface of the specimen.
4. Lower the probe rod until it contacts the needle linkage, then press the “Zero” button.
5. Set the time selection switch to 5s, press the “Start” button, and after 5 seconds, the needle linkage will be locked. Gently place the measuring rod into contact with the needle linkage and read the needle penetration data.
Attention:
① When using the probe to measure depth, apply gentle pressure and lift it lightly—never strike it rapidly.
② When rethreading the needle linkage, press the release button instead of pulling it out while the needle linkage is locked. This will help prevent wear on the needle linkage and its sleeve.
③ After each test is completed, the test needle should be removed, lubricated for protection, and then placed back into its protective sleeve.
Verification method:
1. Visually inspect the connecting rod surface to ensure it is smooth and can freely fall downward by itself, with no signs of tightness or play.
2. Visually inspect whether the scale disc rack is clean, free of deformation, and whether the clamping button operates smoothly.
3. Weigh the standard needle linkage, the linkage and standard needle assembly, and the two weights to an accuracy of 0.01 g.
4. Use a dial caliper and a steel ruler to measure the diameter and length of the standard needle, and use a universal angle ruler to measure the cone angle at the needle tip.
5. Use a WAn angle ruler to measure the maximum deviation of the standard needle, and take the average value after measuring three times.
Relevant Information

The main advantages of the penetration tester are:
The main advantages of the penetration tester are:
2023-11-02

The working principle of the compaction apparatus mainly includes the following points:
The working principle of the compaction apparatus mainly includes the following points:
2023-10-23

The compaction instrument is a device used to measure the bearing capacity of bored pile foundations. Its main features are as follows:
2023-10-13